Easy Installation
Detailed instructions are provided with all our blinds to help ensure fast/hassle free installation.
Tools required to complete installation:
- Tape measure
- Pencil
- Drill
- Screws provided with your blinds.
You may also find the following useful:
- Level (if you have out of square windows)
- Ladder
- No.2 square head screwdriver
Roller Blinds
Ensure the blind will clear any obstructions like mullions & handles.
Use a pencil to mark where you want the brackets. We recommend fixing internally fitted blinds approximately 15mm in from the front edge.

Position the brackets, so they are on the correct side of the window frame. The male control bracket should be fitted to the chain side and the female bracket to the pin end.

Drill a pilot hole using a drill bit smaller than your screw, then screw the brackets in. Eye protection should be worn.
The brackets can be installed 2 ways.
This is the most common way:

Alternative fitting

Brackets can also be turned this way if you have a narrow frame or don’t have enough clearance.
Now you can hang your blind. For large blinds, more than one person may be required.
Firstly rotate the clear disc on the pin end to fully retract the pin.

Always fit the control end first.

Line up the control end of the bracket, it should slot into the centre.
Keep supporting the blind so it doesn’t drop down and move to the pin end. Release the pin slightly and then push it up from the bottom of the bracket. If it is fitted correctly, you will hear the pin lock into place.

The pin assembly is spring-loaded. When you start guiding the spring-loaded pin toward the hole, it will retract until it slots into the hole, making a noise.
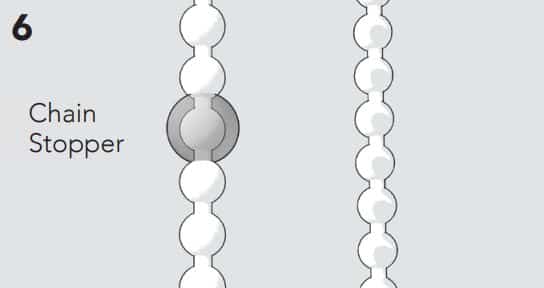
Check the blind is functioning correctly. Using the chain, roll the blind all the way down and then back up. Attach the clear plastic chain stopper to the chain. It will take some trial and error locating the chain stopper for the top and bottom positions.
- Attach the cord guide to the chain by pushing the blind chain through the guide slot until it is trapped within the loop.
- Gently release both the guide and the chain so that they hang freely, with the guide pointing downwards.
- Lightly pull on the cord guide until the chain goes taut and place it against the window frame. Hold it in that position with one hand, and attempt to operate the chain with the other. Ensure that you are still able to raise and lower the blind. If it is too difficult to raise/lower the blind, increase the height of
the cord guide. If it is too loose, and able to form a loop larger than 220mm, pull the cord guide downwards. - When you have found a position for the cord guide that allows for the chain to be taut, yet still comfortable to operate, you can begin to secure it to your window frame. Without moving the cord guide, locate the two screw holes and use your pencil/marker to mark on the frame where the holes should be.
- Then, using the square drive, screw in the first crew, starting from the bottom of the cord guide. As you screw, hold the top of the cord guide flat against the wall. Ensure that the bottom of the chain cord is well fastened, then screw in the second screw to the top of the cord guide.
Important info
- This cord guide must be installed in such a way that a loose cord cannot form a loop 220mm or larger at a height of less than 1600mm above floor level to avoid creating a possible strangulation hazard for children.
- Note that this cord guide CAN be installed under a height of 1600mm above floor level, as long as the cord guide is sturdy and such a loop cannot be formed.
- Any cord guide installed lower than 1600mm above floor level must be capable of withstanding a tension force of 70 N applied in any direction for 10 seconds. A force of 70 N is approximately equal to applying a 7-kilogram weight and has been assessed as the likely amount of force a child may exert on a blind cord guide by grabbing, pulling or hanging on it.
Wooden Venetian Blinds
1)
Before you start installing, it is important to read all the instructions first.
Check that you have all the blinds correctly located at each window/door.
For a standard installation of a venetian blind, the first thing to do is position, and screw both box brackets, 10mm back from the frame edge. Fig 1
The bracket is to be fitted with the hinge at the top. This will allow for the fitting of the facia provided, to be flush with the window frame. Ideally you would have in the region of 75mm of frame depth to ensure a flush fitting facia.

2)
Make sure when you are fitting the brackets in a window frame, that they are clear of any obstructions like wooden mullions that may be in the window area (e.g. sash windows)
Two dome head wood screws are provided for fitting, therefore if it is not being fitted in a standard wooden framed window, you may need to supply your own screws. For example, if you are fitting into an Aluminium framed window you will need to provide your own screws, for fixing.
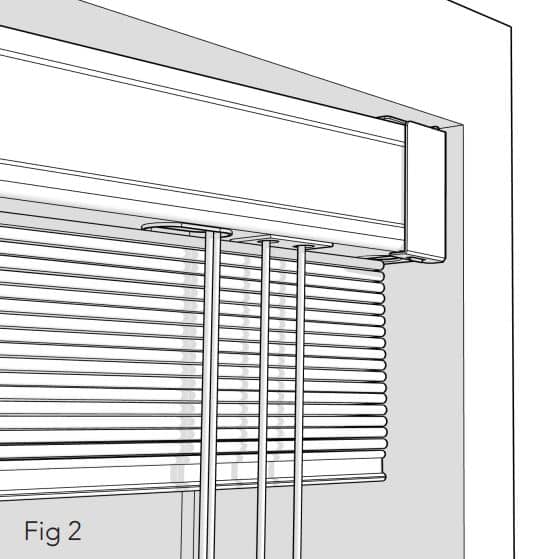
The easiest way to fit the venetian, is to close one bracket side, and slot in the venetian headrail to that closed end. You can then slide the other side into the opened hinged end, and close. Once it is slid into place, close the hinged flap, ensuring you hear a clicking sound, to ensure it is secure. Fig 2
Outside fitting (Wooden Frame)
Most venetians blinds are fitted to the architrave above the window frame. Note the measurement given for an outside fitting venetian is what we make the housing and blades to. This differs from inside fitting. Therefore, if you want to fit the brackets flush with the edge of the architrave, you must request the venetian to be manufactured 10mm less, to account for the brackets.
It is good practice to drill pilot holes for the screws to fit the brackets to prevent any splitting of the architrave because it is near the mitred ends of the architrave.
We also supply a mitred return facia for each side that is 20mm longer than the blind size (10mm each side). The facia needs to be screw fixed together using the L shaped brackets and short screws supplied for the Facia return. The facia is fixed using 3M velcro (supplied).
If the architrave is 10mm thick then the return facia needs to be 85mm (75 + 10)

Long venetians
For Venetian blinds longer than 1700mm, you will be supplied with a centre support bracket which is fitted in line with the housing close to the centre of the blind. Care is required for its
placement. You must keep it away from any componentry like the ladder assembly. For blinds that are longer than 2300mm, we supply an additional bracket for support. Fig 3
Facia
The facia is fitted last. Velcro is already fitted to the housing, so all that needs to happen is for peeling of the velcro, and the placement of the facia at the top of the window frame.
Position the facia touching the top of the window frame, and in an arching action, bring the facia down to stick onto the peeled 3M velcro.

Important info
Cord cleats are a fast and easy solution for keeping kids and animals from the risk of strangulation. Our blinds come with a compliant child-safety device (safety cleat), which must be
installed.
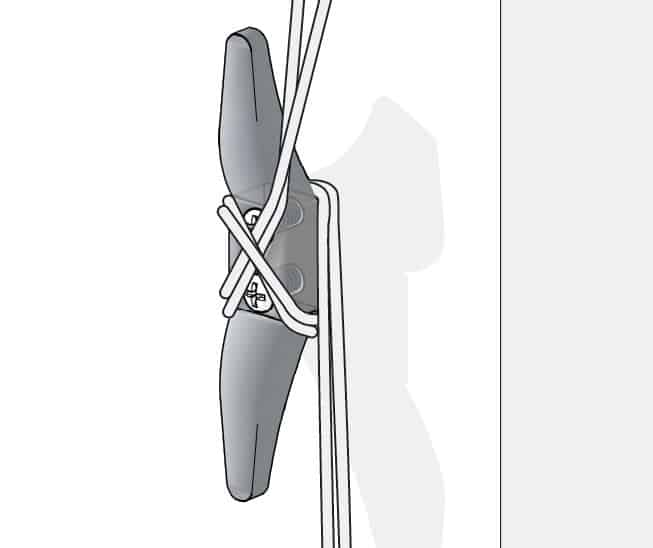
Important: Fix the cleat to the wall. Keep the cord taut at all times by wrapping it around the cleat in a figure-of-eight pattern.
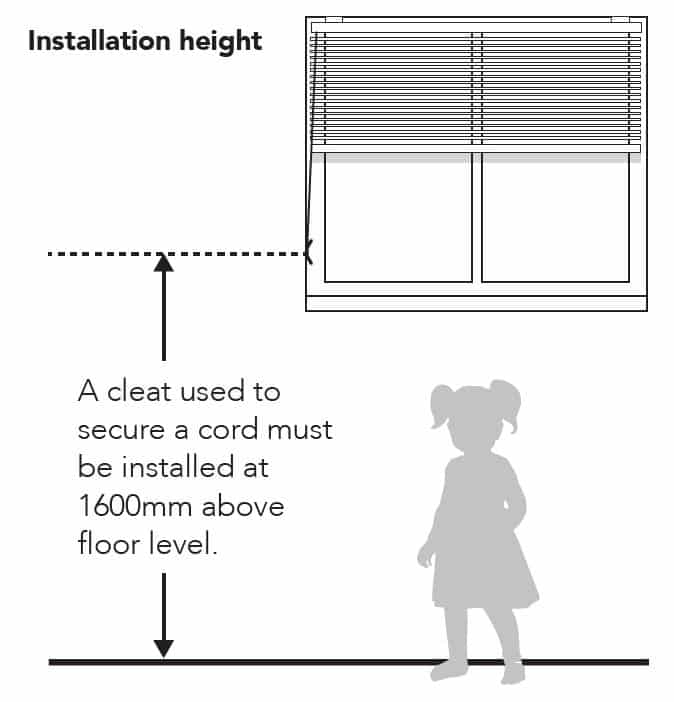
Safety cleat must be installed at a minimum height of 1600mm above floor level.
- Place the safety cleat in the desired position and mark the holes with a pencil.
- Drill the screws provided to attach the safety cleat to the wall.
- Once the cleat is installed, wrap the cords around the cleat in a figure-of-8 pattern. The cord must be fully accumulated around the safety cleat when the blind is not in use.
Aluminium Venetian Blinds
Aspect blinds come with brackets and screws.
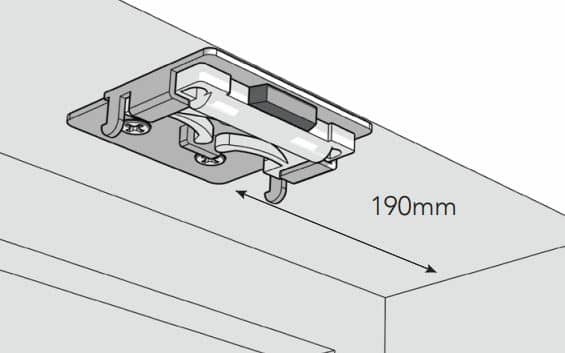
Internal Mount Blind Bracket
Follow steps 2 and 3 for internal blinds to complete installation.
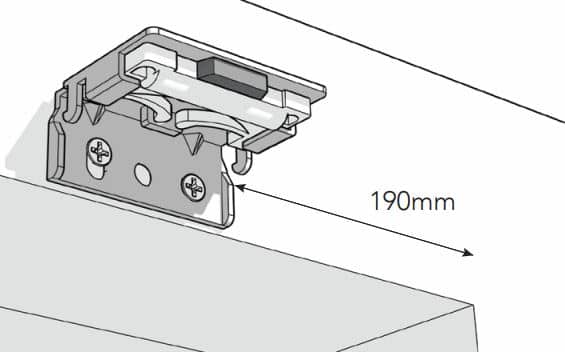
Outside Mounted Blind
Place one screw through the back of each bracket to the face of the window frame, making sure the blind will have a clear path when dropped.
Once unwrapped, handle the venetian blind from underneath the bottom rail.
1)
Now place one screw through the top of each bracket to the underside of the window frame, making sure the blind will have a clear path when dropped.
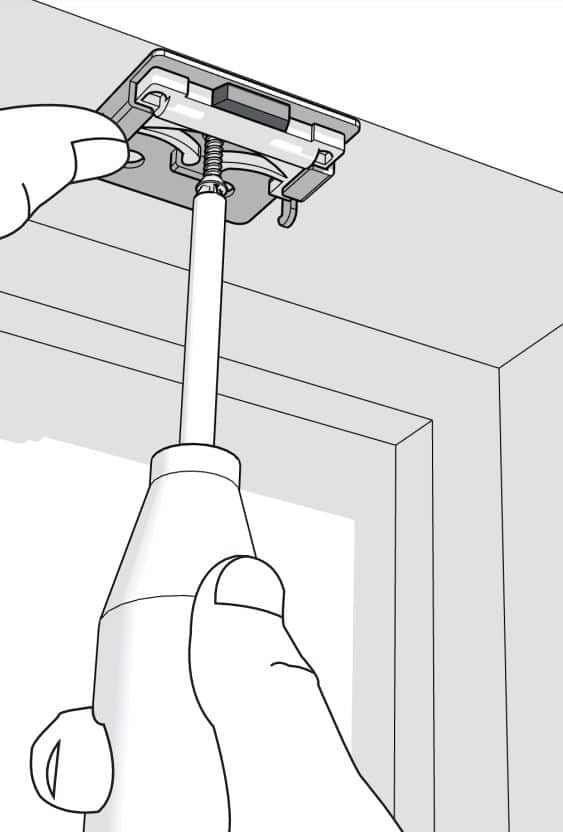
Important for internal and outside mount:
Brackets are to be placed 190mm from each end and as even as possible throughout the rest of the blind making sure the middle brackets are placed between the ladder tapes so they do not interfere with the workings of the blind.
2)
To install your blind, hold the blind from underneath the bottom rail and hook the front lip of your head rail over the entire brackets. Note the slight angle on the head rail when installing.
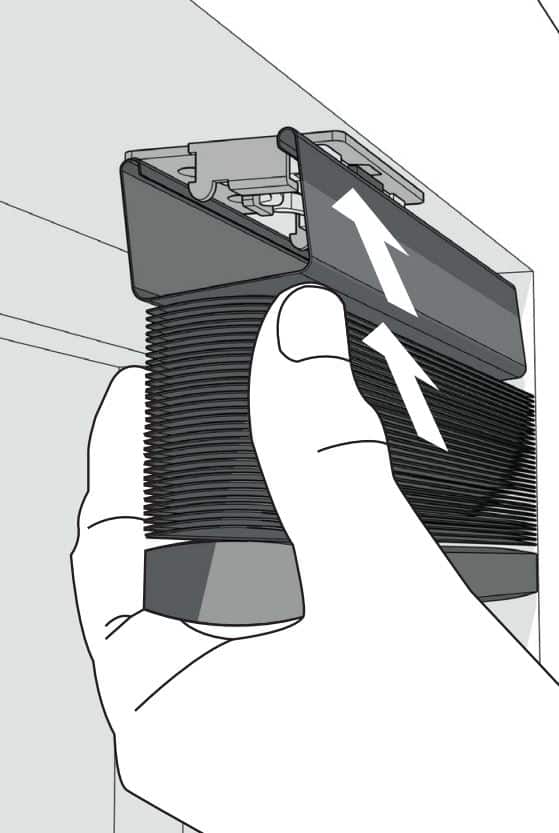
3)
Push the head rail toward the window with a slight upwards motion, to get the rear of the head rail to hook under the rear lip.
This can generally be done in one action but with larger blinds you may need to work from one side to the other
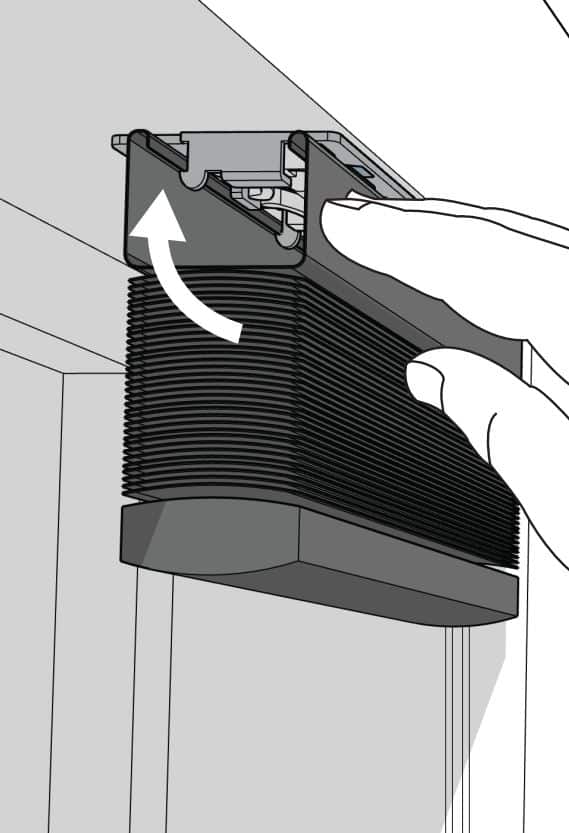
Note: It is easier to clip in one bracket at a time when installing the blind rather than all of the brackets at one time. Your blind is now installed - and can be lowered.
Important info
Cord cleats are a fast and easy solution for keeping kids and animals from the risk of strangulation. Our blinds come with a compliant child-safety device (safety cleat), which must be
installed.

Important: Fix the cleat to the wall. Keep the cord taut at all times by wrapping it around the cleat in a figure-of-eight pattern.
Safety cleat must be installed at a minimum height of 1600mm above floor level.
- Place the safety cleat in the desired position and mark the holes with a pencil.
- Drill the screws provided to attach the safety cleat to the wall.
- Once the cleat is installed, wrap the cords around the cleat in a figure-of-8 pattern. The cord must be fully accumulated around the safety cleat when the blind is not in use.

Vertical Blinds
Supplied Brackets
Carefully unwrap the Vertical blind and it’s associated brackets.
There are a number bracket options for example face fix, top fix screw fit or spring fit.
1) Fitting the Brackets
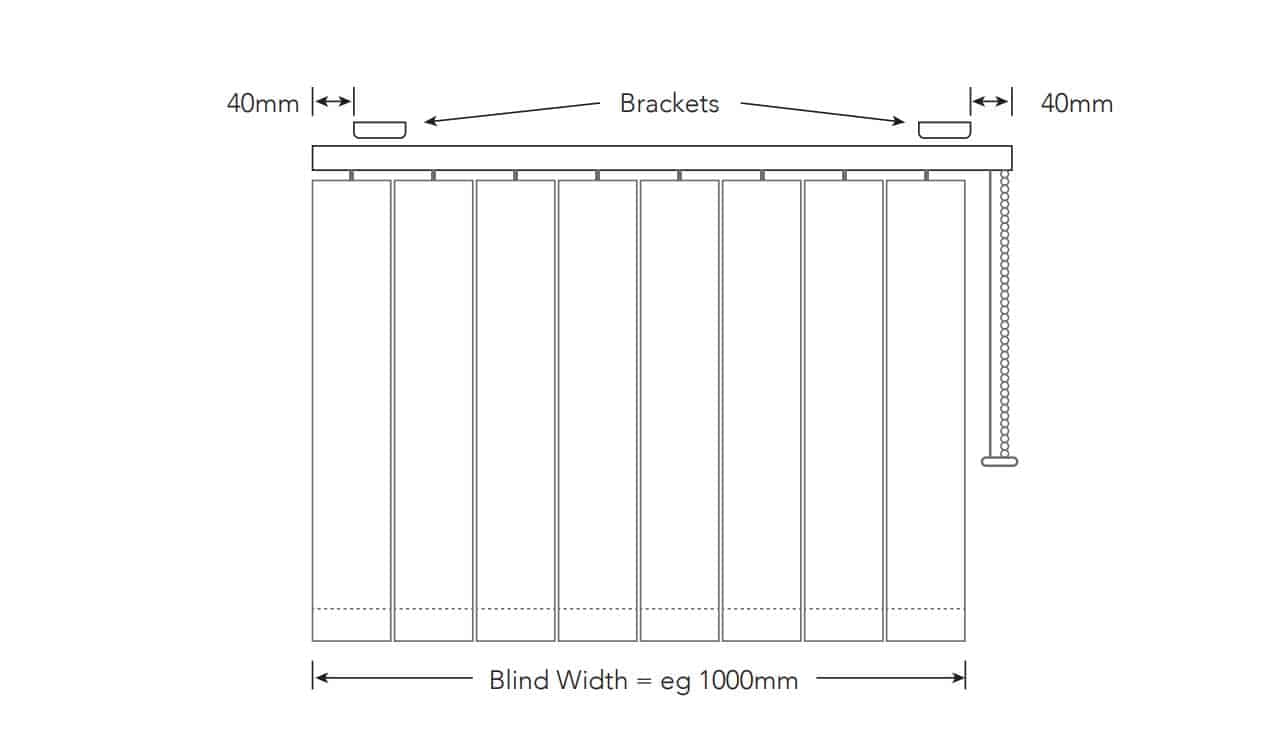
The brackets should be located to allow for the depth of the louvres on the blind. The brackets should therefore be attached to the ceiling or window frame clear from any obstruction on a line 55mm (2 1/8”) for 89mm louvres. For a blind up to 1 metre wide attach two ackets fitted approximately 40mm (1 1/2”) from each end of the blind (fig 1).
Any intermediate brackets should be spaced evenly between these and as a general rule:
Up to 1m = 2 brackets 1m to 2m = 3 brackets
2m to 3m =4 brackets Over 3m = 5 brackets
Mark the hole positions before drilling and plugging if necessary. Use two screws for a face fix bracket and one screw in a top fix bracket ensuring that the brackets are level. Remember to allow room for the blind to clear any obstacles when deployed, eg. door or window handles.
2) Fitting the Track
The track should be fitted into the brackets keeping the operating cords on the side of the blind as ordered (LH/RH control).
If using a face fix screw bracket, locate the blind with the groove on the back of the headrail and fit it into the middle lip of the bracket. Now push the blind upwards until the headrail is sitting level on the bracket before tightening the securing screw from the front of the blind. Do not over tighten these screws, it is unnecessary and may damage the track.
If using a top fix spring clip bracket you should push the track upwards then tilt away from you to locate the spring bracket front lip into the front groove on the track. Push upwards and the track will click into place.
3) Fitting the Louvres
Turn the hooks on the carriers of the track so that the slots are at 90 degrees to the track. Hang the louvres and ensure the seams are all facing the same direction. The blind is now ready to operate.
Removing the Track
Before removing a track first take down all the louvres from the blind and release the cord and chain from the cord tidy.
With brackets that have retaining screws, unscrew the retaining screw sufficiently to clear the groove on the blind track. Repeat this with each bracket and the track will come away.
For spring clip brackets push upwards against the tab at the back of the bracket to release the blind from the bracket. Do this with each bracket and the track will come away.


- The cord tidy is a three piece device with a back plate, a centre piece and a front plate. The space between back and centre pieces will hold the chain and the area between the centre and front plate will hold the cord.
- Assemble the cord tidy and position it to the wall at the furthest distance below the vertical system adding appropriate tension to the cord and chain and mark its location. Fig 1
- Split the cord tidy and mark the remaining offset hole position before drilling and plugging both location holes if necessary. Use both of the holes to fix the back piece of the cord tidy to the wall. Fig 2
- Re-assemble the cord tidy with the cord and chain and fix it in position with a screw through the centre hole. Fig 3
- Push fit a cover cap over the screw hole opening. Fig 4
Important info
Cord tidies are a fast and easy solution for keeping kids and animals from the risk of strangulation. Our blinds come with a compliant child-safety device (cord tidy), which must be installed.


